Management of A. cerana
Transfer from a Log hive to a Top Bar hive
The beekeeper should aim to time this operation for the middle of the build-up flow, mid-February, when the population is not at its maximum but there are plenty of eggs and young larvae, is considered ideal. You are unlikely to find the queen during this process, and therefore it is important to make sure at least one of the combs transferred contains eggs or very young larvae. This will allow the colony to produce a new queen if the old one is damaged or lost in the operation. The combs in a log hive are attached in an arc across the top of the log and it is necessary to cut the top edge of the combs in a straight line when fitting them to a Top Bar.

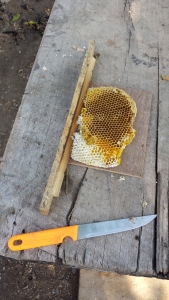
The comb is laid on a piece of 1/4″ ply, to raise it. The top bar and comb are pressed gently together.
The bees store honey in a band across the top of the combs and the newer combs on the edges of the nest containing stores are more fragile, therefore, there is a danger that much of the comb containing stored honey is destroyed during this process. The bees need to produce new comb after the move and bearing in mind that the bees need up to 7 lbs of honey to produce 1 lb of wax, and that they will also be agitated, it is a good idea to feed them after the move. This will enable them to produce comb and will help settle them in their new home. Smoking before the move “calms” the bees and encourages them to take on as much honey as they can, in their honey stomachs, for later use. On a warm sunny day when the temperature outside the hive is close to 30-35 degrees C and having assembled all the tools and equipment you need, carry out the following sequence of operations:-
1/ from a length of cotton cloth, of the type used for bandages, tear 2″ strips about 2′ long. Split one end and tie a thumb knot with the two tails to prevent further tearing. Secure the strip, known as a hammock, to one end of a Top Bar with the two tails, do this with 7 or 8 bars.
2/ cut a piece of plywood to the size of 4 top bars side by side.
3/ prepare 3 or 4 spare top bars by running a block of wax along the ‘comb attachment ridge’ and set aside.
4/ prepare a Top Bar hive (TBH) with a full complement of top bars and 3 divider boards one of them a feeder/divider board.

Shown are Box hive and top bar hive comb supports (top bars). a home -made veil, super frame, divider and dummy boards and a feeder board with feeder tray.
5/ on the TBH enclose the central nest space between two divider boards one of which is the feeder-board and place the empty feeder tray in position. Cover with 6 top bars and the piece of ply cut to the size of four of the top bars. The piece of plywood should be at the opposite end of the nest space to the feeder.
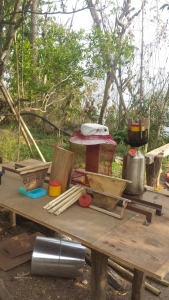
6/ place a small table, to be known as the operating table, adjacent to the TBH hive. This table will be used to mount the combs on to top bars.
7/ smoke the bees and wait 2 minutes for this to take effect.
8/ block the entrance to the log hive with grass, gover or a piece of cloth.
9/ move the log hive and mount it nearby so that it is stable and positioned to make it easy to cut out and remove the combs built within it.
10/ place the hive into which you are moving the colony in the space previously occupied by the log hive.
11/ the log hive normally comprises a hollow log with open ends, remove one of the ends. If the log hive is in two halves longitudinally turn it upside down and remove what was the bottom section.
12/ with a long thin knife carefully cut the attachments of the nearest comb in the log hive, gently brush the bees back into the log and remove the comb to the operating table.
13/ trim the top of the comb straight and press it against a Top Bar that has a cotton strip/hammock tied to it. Pass the hammock around the comb carefully and cut it to length leaving enough to make two “securing” tails, tie these to the top bar such that the comb is held firmly against the top bar. Drip molten wax where the comb meets the top bar, allow it to cool then carefully turn the assembly over and drop molten wax to secure the comb to the top bar on the other side. Allow the wax to cool.

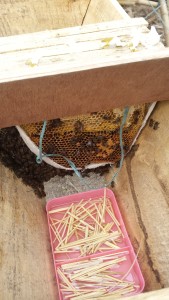
A comb held tight against the top bar by its hammock. below a sugar feeder with straw sprinkled on the syrup.
14/ the new nest space is covered with 6 top bars and the piece of ply cut to the size of four of the top bars. Remove one bar from the nest space cover and put it on the operating table, lift the plywood cover and carefully place the top bar, to which you have secured comb, in the new nest space, replace the plywood and repeat the process with each newly mounted comb. Each new comb should if possible, be placed in the same order in which it was removed from the log hive so that adjoining comb faces in the log hive are adjoining in their new nest, with a little planning you’ll soon get into a routine. When tipping bees into the hive remove the plywood to give a good gap, brush or shake the bees into the hive then replace the plywood. Keeping the nest space covered means less bees in the air and less agitation. After the first two or three combs have been mounted and placed in the receiving hive the bees clinging to the comb before it is mounted can be brushed into the new hive through the space provided by the piece of ply covering the last four top bar spaces.
15/ Periodically ease a cluster of bees, crawling around the bottom of the log onto a small plate, or a similar receptacle and gently tip them into the receiving hive. I use the open palms of my hands but if you’re not wearing gloves you may be stung frequently. If stung, scrape out the sting and smoke the site of the sting, this is said to mask the scent of the venom which stimulates other bees to sting as well.
16/ When all the combs have been mounted and inserted in the hive place one empty top bar in the centre of the brood nest and two empty bars at the honey end of the nest.
17/ feed the bees.
Notes on tools and equipment needed*
A sharp, long, thin, “bendy” bladed knife. The knife is for cutting the comb attachments.
A tool for removing the “gover” (dung) and soil mixture used to join the components of the log hive. We used a flat bladed screw driver and a wood chisel.
Some means of melting wax to secure the comb to the top bar. At different times we have used different methods. An ordinary cigarette lighter was used early on but this presented problems. Several lighters fell apart because, in order to get the wax to drip neatly onto the joint between the comb and the top bar it was necessary to hold the lighter horizontally and its flame was playing on the lighter sparking mechanism and when its component parts softened or melted the lighters fell apart. We resorted to melting the wax in a little alloy pot and this worked up to a point, but if the wax is too hot it melts the comb and passes straight through onto the operating table. We are now melting the wax in a small plastic pot floating in hot water so as to better regulate the temperature of the molten wax. Here some practice and experiment, if possible with a spare piece of comb is advisable.

The small yellow pot contains molten wax and is floating in hot water. The syringe contains hot water to keep it hot, this water is ejected and wax drawn in.
A lighted smoker. With spare fuel, newspaper and a lighter.
All the wax that has come into our possession we have melted and cut it into thin strips, for attaching combs to the top bars and to smear the top bar attachment ridge as this makes that point attractive to the bees when they are looking for a point to attach their new comb.
A water spray, although we have never used it, I have found it useful in the past to help limit the amount of smoking used.
Scissors to cut the hammocks to size.
Two veils or as appropriate to the size of your team, I don’t always use a veil working with cerana but this operation is extremely invasive.
Rubber gloves. I brought out a box of the thin plastic throw-away type although the bees can sting through them easily, anything thicker would, I fancy, make moving cluster of bees a little clumsy and they may hide my scent.
A feeder appropriate to the hive receiving the bees.
Syrup, we use a 1:1 sugar, water mix. We boil the water and add the sugar to it.
Cloth covers, two, one for the log hive and one to cover the receiving hive when not working on the one or the other.
A queen marking kit. Finding the queen during the operation is fairly unlikely and many beekeepers don’t bother to Mark her anyway.
A queen cage. If you find the queen this could be important to save her from damage.
A bee brush, we use a soft 3″ paint brush.
A small measure of good luck.
Dear Barry,
G;ad you were not affected by the Earthquake. I trust all is well.
I assume you have found that A.cerana are easier to handle that A.melliferra, as you say you don’t always wear a viel. I of course didn’t even have one!
I thought you gave a good write up of the procedure. Are the logs split in halt long ways. When you separate the two halves, do you not get some comb adhering to one-half and some to the other?
With you electrical knowledge have you not thought of drilling a smell hole towards the end of each top bad and passing a thin wire along the bar and through the holes winding the ends round the bar to stretch the wire tightly along the bar. Then pressing the edge of the comb tightly onto the wire and passing a small current through it to melt the wax onto the bar and wire. However you seem to be doing fine. Good to hear from you. Regards, William
LikeLike
Thanks Bill you’re an inspiration to an awful lot of beekeepers including me. I like the idea of using an electric current to fix the combs but unfortunately the supply is pretty intermittent here. Yes the bees are much easier to handle They’re quieter on the comb,the Queen is easier to spot and they seem more communicative somehow. One of the main indicators of colony wellbeing seems to be the amount of pollen they carry into the hive. I’ve got a couple more blogs ready to post. I hope they bring back some interesting memories for you. Regards Barry
LikeLike
Hi Barry glad everything is going ok give my regards to all. My bees are doing well have divided them into three colonies
Best wishes
Colin
LikeLike